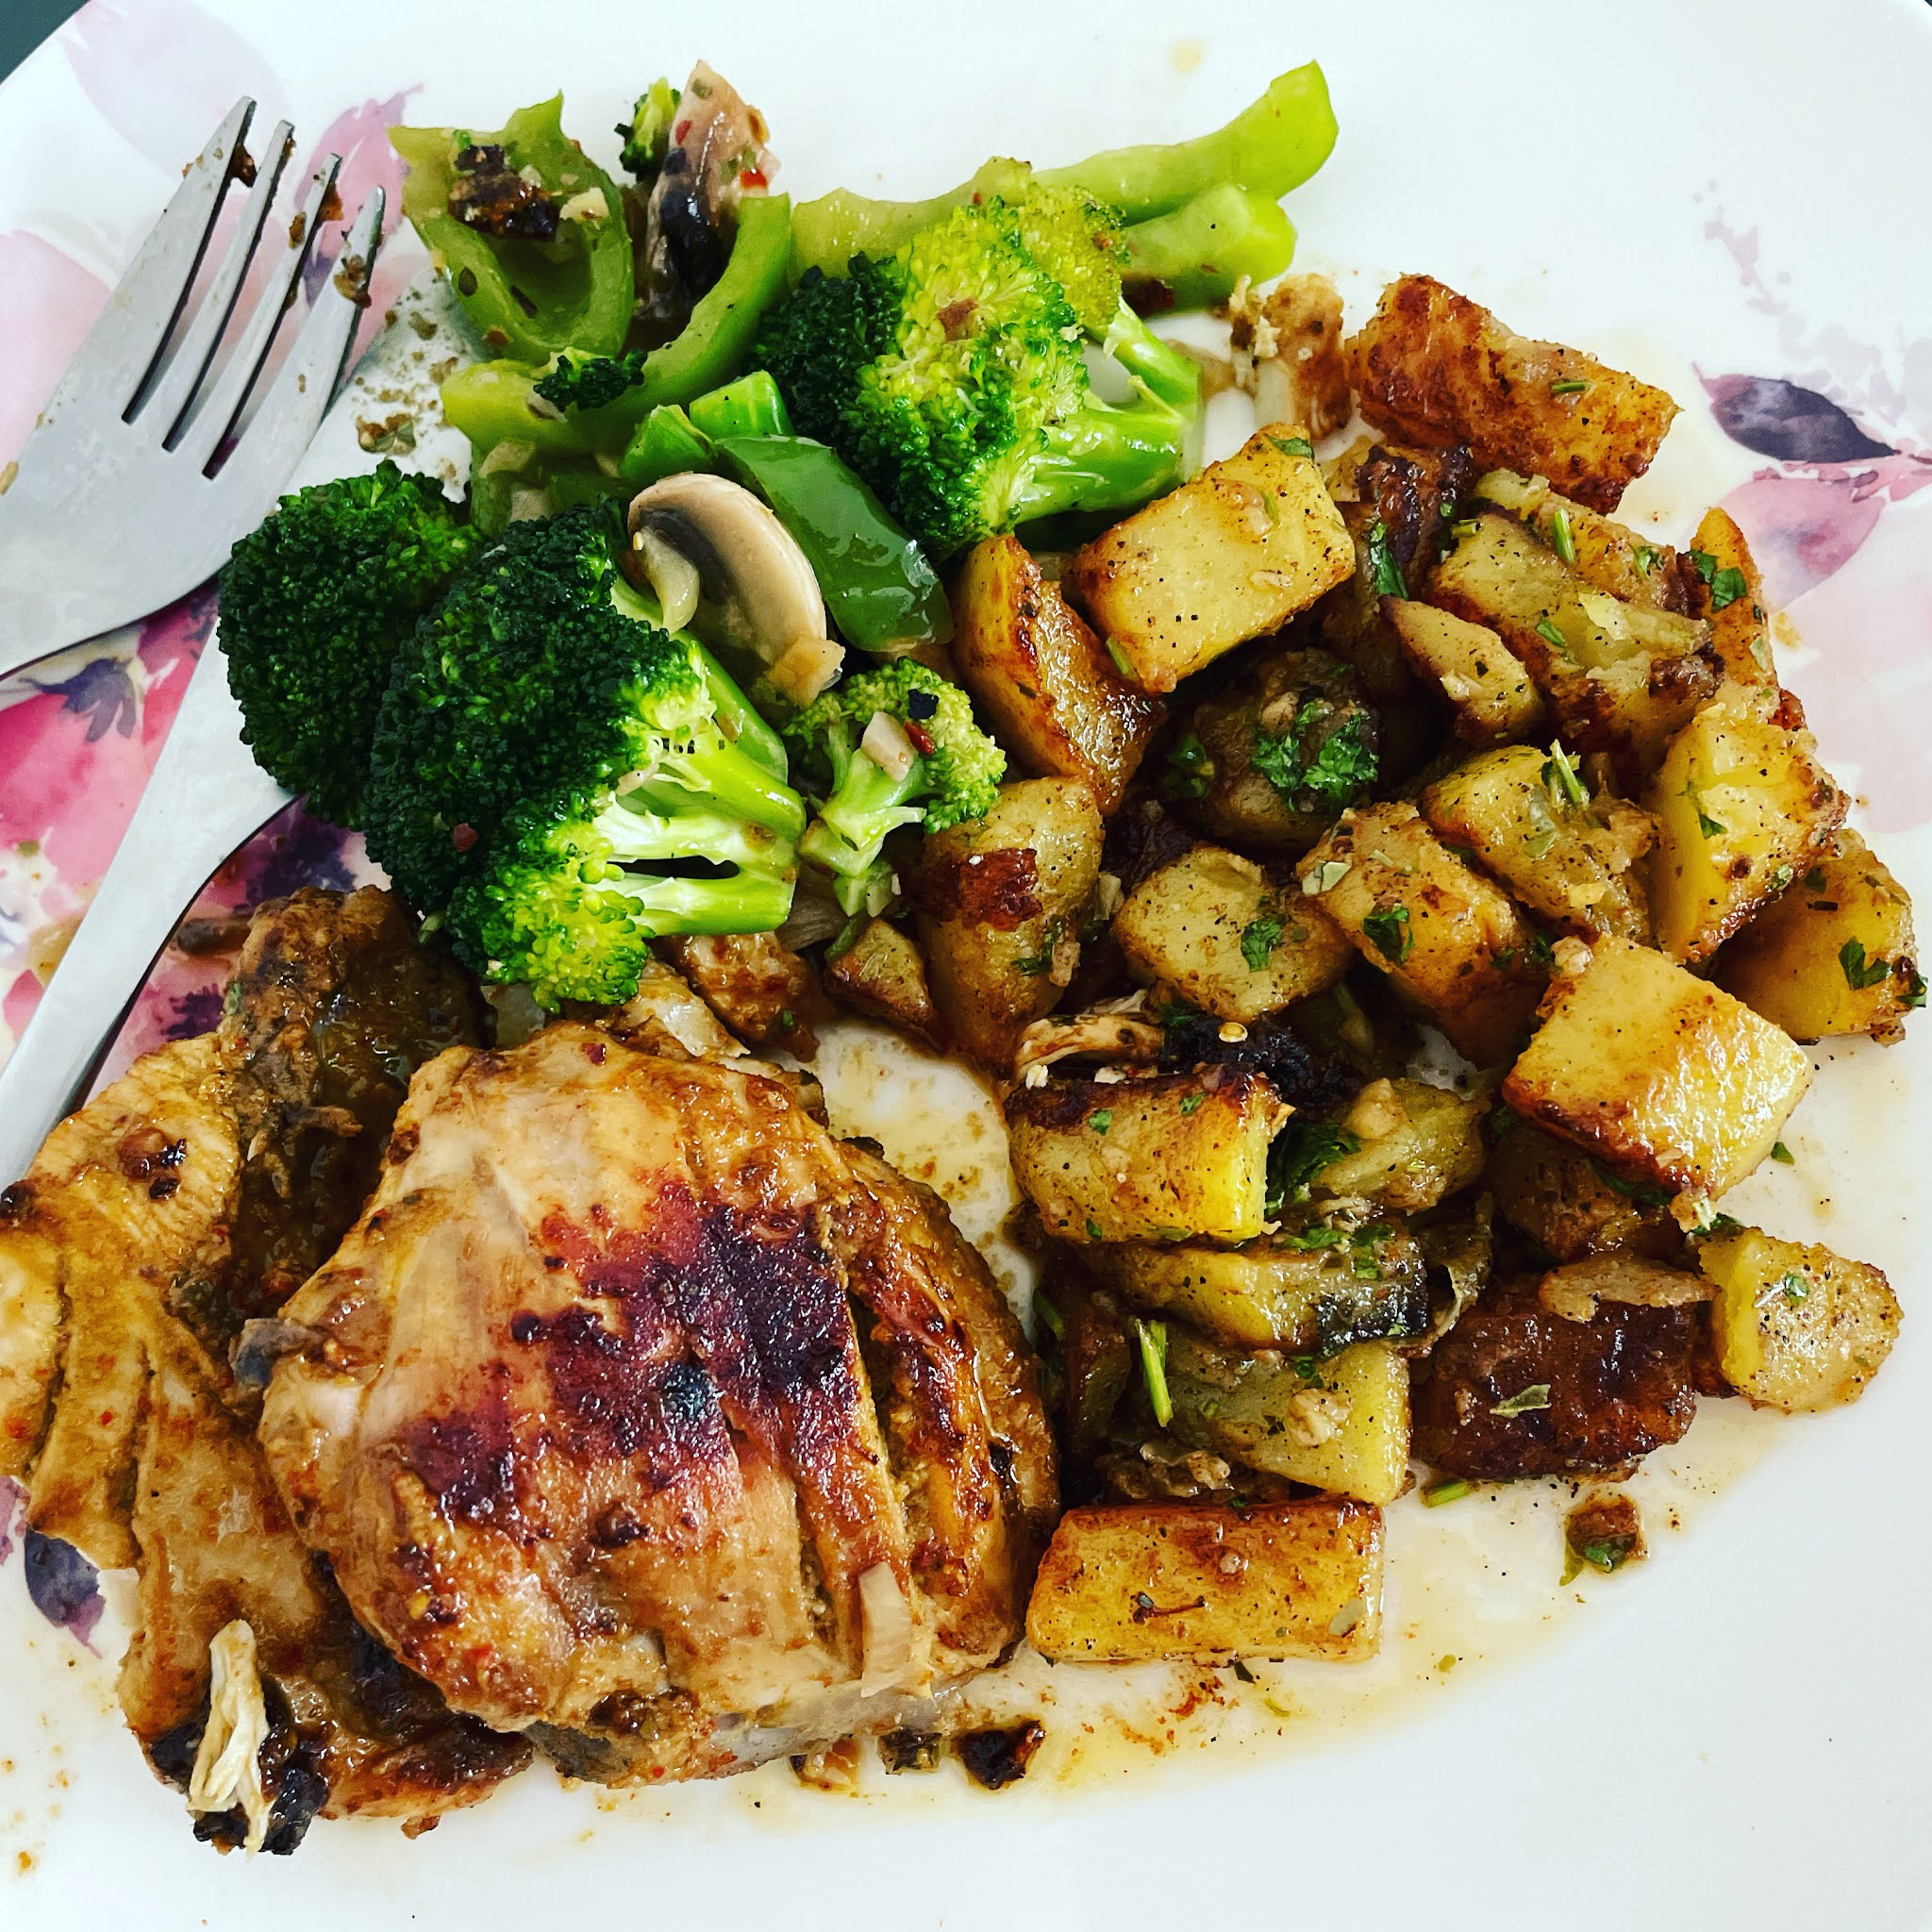
Sunday, December 30, 2012

Daring Bakers December 2012 - Panettone


This month we had a new bread to make as part of our DB challenge and I loved the sweet, rich bread. Though I didn't make it the traditional way with the candied fruit, my version with chocolate and nuts got happy responses from all my colleagues.

Blog Checking Lines: The December 2012 Daring Bakers’ challenge was hosted by the talented Marcellina of Marcellina in Cucina. Marcellina challenged us to create our own custom Panettone, a traditional Italian holiday bread!

Recipe 
Special Equipment - One panettone paper or pan. I used a 7 inch round cake pan and attached a collar using parchment paper on the inside. I used butter to stick the paper to the sides and stapled the edges together.

Ingredients - Makes one 7 inch Panettone

Sponge
1 Tsp Instant Yeast
40 ml Warm Water
1/4 Cup (35 gms) Unbleached All Purpose Flour

First Dough 
1 Tsp Instant Yeast
1 1/2 Tbsp Warm Water
1 Large Egg (At room temperature)
1/2 Cup + 2 Tbsp (87.5 gms) Unbleached All Purpose Flour
2 Tbsp Sugar
1/4 Cup (1/2 stick/57.5 gms) Unsalted Butter (At room temperature)

Second dough
1 Large Egg
2 Medium Egg Yolks
5 Tbsp (75 Gms) Sugar
1 1/2 Tbsp Honey
2 Tbsp Vanilla Essence
1/2 Tsp Salt
1/2 Cup (1 Stick/113 Gms) Unsalted Butter (At room temperature)
1 1/2 Cups (210 Gms) Unbleached All Purpose Flour plus up to (1/3 cup) for kneading
Grated zest of 1 orange

Filling and final dough 
100 Gms Lindt Orange Intense Chocolate Bar
1 Cup Milk Chocolate Chips
1 Cup Chopped Walnuts/Pecans

Make the Sponge
1. Mix the yeast and water in a small bowl.
2. Mix in the flour.
3. Cover with plastic wrap and allow to double in size for about 20 to 30 minutes .

Make The First Dough
1. In the mixer bowl, mix together the yeast and water.
2. With the paddle attached mix in the sponge, eggs, flour, and sugar.
3. Add in the butter and mix for 3 minutes until the dough is smooth and even.
4. Cover with plastic wrap and allow double in size, about 1 – 1 ¼ hours.

Make The Second dough
1. With the paddle mix in thoroughly the eggs, egg yolks, sugar, honey, vanilla, orange zest and salt.
2. Mix in the butter until smooth.
3. Add the flour and slowly incorporate.
4. At this stage the dough will seem a little too soft, like cookie dough.
5. Replace the paddle with the dough hook and knead for about 2 minutes.
6. Turn out the dough and knead it on a well-floured surface until it sort of holds its shape.
7. Don’t knead in too much flour but you may need as much as 2/3 cup (100 gm). Be careful the excess flour will affect the finished product.

First Rise
1. Oil a large bowl lightly, plop in your dough and cover with plastic wrap.
2. Now we need to let it rise until it has tripled in size. There are two ways to go about this.
Rise in a warm place for 2 – 4 hours.
Or find a cool spot (64°F -68°F) (18°C – 20°C) and rise overnight.
Or rise for 2 hours on your kitchen bench then slow the rise down and place in the refrigerator overnight. I placed my bowl on the kitchen counter as we have central A/C and it rose perfectly.

Filling and Final Rise
1. Place a large piece of parchment on the counter and press out the dough onto an oval shape.
2. Sprinkle over half of the filling and roll up the dough into a log
3. Press out again into an oval shape and sprinkle over the remaining of the filling
4. Roll into a log shape again.
5. Shape into a ball and slip into your prepared pans, panettone papers or homemade panettone papers. (I rolled the parchment paper into a cylinder and used it to slip the dough in my prepared pan.)
6. Cut an X into the top of the panettone and allow to double in size.
7. Rising time will vary according to method of first rise. If it has been in the refrigerator it could take 4 hours or more. If it has been rising on the kitchen bench in a warm place it should be doubled in about 2
hours.

Bake The Panettone 
1. When you think your dough has only about 30 minutes left to rise preheat your oven to moderately hot 400°F/200°C/gas mark 6 and adjust your oven racks
2. Just before baking carefully (don’t deflate it!) cut the X into the dough again and place in a knob (a nut) of butter.
3. Place your panettoni in the oven and bake for 10 minutes.
4. Reduce the heat to moderate 350°F/180°C/gas mark 4 and bake for another 10 minutes
5. Reduce the heat again to moderate 325°F/160°C/gas mark 3 and bake for 30 minutes until the tops are well browned and a skewer inserted into the panettone comes out clean.
6. Cooling your panettone is also important. If you have use papers (commercial or homemade) lie your panettoni on their side cushioned with rolled up towels. Turn gently as they cool. If you have used pans
cool in the pans for 30 minutes then remove and cushion with towels as above.

Happy Eating!!

Wednesday, December 19, 2012

Red Velvet Cake for a Birthday Boy


Yesterday we celebrated hubby's birthday and by celebrate I mean we went for dinner to his favorite restaurant and ate a lot of food. We also ate this fabulous cake that is a deep red and tastes so much of cocoa. It is moist and a dream to work with.

Since his birthday fell in the middle of the week I had somehow completely forgotten about it and remembered only on 17th night. That too when my brother reminded me (hangs head in shame).


I had no time to make complicated cakes like the Black And White chocolate Cake or the Boston Cream Pie I had made in previous years. I had to quickly think of an easy cake to make, one that did'nt require too much effort and looked fab on its own. Immediately I thought 'Red Velvet' and googled for a recipe. I came across Smitten Kitchen's awesome recipe and made half the quantity in two 8 inch pans. Red Velvety goodness!

Since it was last minute and I didn't have frosting ingredients I decided to go the easy way and use whipped cream. I had some frozen whipping cream which I thawed overnight in the fridge. When I put it in the mixer bowl to whip, it just refused to do anything. In a panic I raided my cupboards and came upon my saviour - Dream Whip! Eeks, I know, but it whipped up perfectly and saved the day.

Recipe Source - Smitten Kitchen

Ingredients - Makes Two 8 inch layers

1 3/4 Cups Cake Flour
1/4 Cup Unsweetened Cocoa (not Dutch process)
3/4 Tsp Salt
1 Cup Sunflower Oil
1 Cup + 2 Tbsp Granulated Sugar
2 Medium Eggs
1/2 Tsp Red Gel Food Coloring dissolved in 3 Tbsp Water Or 3 tablespoons (1.5 ounces) liquid red food coloring
3/4 Tsp Vanilla Essence
2/3 Cup Buttermilk
1 Tsp Baking Soda
1 1/4 Tsp White Vinegar
Butter for greasing pans.

1. Preheat oven to 175 degrees C (350 degrees F). Grease the bottom and sides of pans and place a round of parchment on the bottom. 
2. Whisk the cake flour, cocoa and salt in a bowl.
3. Place oil and sugar in bowl of an electric mixer and beat at medium speed until well-blended. Beat in eggs one at a time. With machine on low, very slowly add red food coloring. (Take care: it may splash.) Add vanilla. Add flour mixture alternating with buttermilk beginning and ending with the flour. Scrape down bowl and beat just long enough to combine.
4. Place baking soda in a small dish, stir in vinegar and add to batter with machine running. Beat for 10 seconds.
5. Divide batter among pans, place in oven and bake until a cake tester comes out clean, 40 to 45 minutes. Let cool in pans 20 minutes. Then remove from pans, flip layers over and peel off parchment. Cool completely before frosting.

Happy Eating!

Saturday, December 1, 2012

Spicy Chicken and Potato Salad


This is one of my new favorite salads as it has a myraid of flavors that come together beautifully. A very simple recipe, it is very easy to whip and will surely impress company.


Recipe Source - From a magazine clipping, unfortunately I don't have the source.

Ingredients - Serves 2

4 Chicken Breasts (Cut into strips)
500 Gms Potato (Peeled and Cut into wedges)
Olive oil for potatoes
Salt To Taste
Mixed salad leaves like lettuce, rocca etc.
For the Spice Paste
1 Tsp Ginger Garlic Paste
1 Tsp Red Chili Powder
1 Tsp Cumin Powder
1 Tbsp Olive Oil
1 Tsp Lemon Juice
Salt To Taste
For The Dressing
1/4 Cup Finely Chopped Onion
1 Cup Chopped Tomato (Seeded)
1 Cup Chopped Oranges (Peeled and Seeded)
Fresh Coriander Leaves (Chopped)
Few sprigs of Fresh Mint leaves
1 Tbsp Olive Oil

Prepare the Chicken
1. Mix all the ingredients for the spice paste and coat the chicken strips with it. Cover and refrigerate for one hour.
2. Heat the oil in a pan and cook the chicken strips on medium high heat till done.
Prepare the Potatoes
1. Parboil the potato wedges in salted water for 3 minutes and drain. Place on a baking sheet that has been lined with foil. Drizzle the potatoes with a little olive oil and sprinkle with salt to taste. 
2. Preheat the oven to 200 Degree C, and place the potatoes in the oven. Bake for 30 minutes turning once. Remove from oven and allow to cool.
Make The Dressing
1. Mix together all the ingredients in a large bowl.
Assemble the Salad
1. Add the cooked chicken,potatoes and salad leaves to the bowl with dressing. Toss well and serve.

Happy Eating!!

Wednesday, November 28, 2012

Daring Bakers Nov 2012 - Chocolate Cheesecake Bars


These cheesecake bars are the result of a kitchen disaster. It all started out with Peta of Peta Eats challenging us to make a celebration cookie, square or bar for this months Daring Bakers challenge. She provided us with 12 recipes and I chose the Chocolate and Caramel Turtle Bars as they looked really yum.

Unfortunately for me, I didn't cook my caramel layer for the bars properly and all I had in the end was a big buttery mess. I didn't want to throw all those good ingredients so I reached out to Peta asking her how I could re purpose my failed bars. She gave me the brilliant idea to crush them up and use as a cheesecake base. I took this idea and made a two layer cheesecake bar. The bottom layer is nutty, chocolatey and dark while the top layer is smooth, sweet and silky. What a fabulous result!

Recipe Source - Adapted from Peta of Peta Eats and Annie's Eats

Ingredients
For The Crust (My crust was the failed turtle bar but I have given a recipe below to imitate the flavour)
1 Cup Pecans or Walnuts
2 Cups Crushed Digestive Biscuits or Graham Crackers
100 Gms Dark Chocolate
1 Cup Brown Sugar
1/2 Cup Melted Butter

For The Cheesecake Layer
8 Oz Cream Cheese (At room temperature)
4 Tbsp Sugar
4 Tbsp Plain Yogurt or Sour Cream
1 Large Egg
1/2 Tsp Vanilla Essence
A pinch of salt

1. Preheat the oven to 325 Degree F (162 Degree C). Line a 9 X 3 inch rectangle pan or 8 X 8 inch square pan with foil overhanging from the sides.
Make The Crust
1. Place the nuts in the bowl of a food processor and pulse until the nuts until finely chopped. Add the biscuit crumbs, chocolate and sugar and process till the chocolate is broken into smaller bits. Add the butter and pulse till combined.
2. Transfer the mixture to the prepared pan and spread evenly. Bake for 10 minutes. Remove from oven and set aside. Leave the oven on at the same temperature.
Make The Filling
1. In the bowl of an electric mixer fitted with paddle attachment, add the cream cheese and beat on medium high for 2 minutes till smooth.
2. Add the sugar and beat till well combined.
3. Add the yogurt/sour cream, vanilla and salt. Beat till combined.
4. Beat in the egg till well combined.
Assemble and Bake
1. Pour the cheesecake batter on the crust and level with an offset spatula.
2. Place in the middle rack of the oven and bake for 30 - 35 minutes till the edges are browned and the center is slightly wobbly.
3. Remove from oven and cool completely on a wire rack. Cover with plastic wrap and place in fridge for 3 hours. Cut into bars and serve. Store covered in fridge.

Happy Eating!

Sunday, August 26, 2012

Peach and Cherry Crumb Bars


I ate my very first crumb bar from a famous coffee house and needless to say I was extremely disappointed. The filling was hardly there, the biscuit was nothing to write home about.


 Then I started seeing these Peach  crumb bars all over the Internet (August is National Peach Month) and my interest was piqued. Surely, there must be something good abut them if so many bloggers have written about it. I also had three luscious peaches sitting in my fruit basket along with some plump cherries. I gathered my supplies and baked these gorgeous bars which are tart and sweet and so good when warm I must have eaten three pieces straight from the pan (maybe more, my mind is blank).


I halved the original recipe and made them in a smaller pan because it's only the two of us. You can make the original recipe with any fruit like blackberries, raspberries etc.


Recipe Source - Adapted from Annie's Eats

Ingredients
For The Biscuit base
1 1/2 C All Purpose Flour
1/2 C Sugar
1/2 Tsp Baking Powder
A Pinch of Salt
1 Tsp Lemon Zest
8 Tbsp (1/2 C/113 Gms) Cold Unsalted Butter
1 Large Egg Yolk

For The Filling
1 Cup Peeled and Chopped Peaches (I got this from 3 peaches)
1 Cup Pitted and Chopped Cherries (About 250 Gms)
2 1/2 Tsp Cornflour (Cornstarch)
1/3 C Sugar

1. Preheat the oven to 175 Degree C or 350 Degree F. Grease a 6X10 baking pan.
2. In a medium bowl, add all the filling ingredients and mix gently. Keep aside.
3. Place the flour, sugar, baking powder, salt and lemon zest in a bowl, stir with a whisk.
4. Add the butter and egg yolk. Cut into the flour using a pastry cutter or folk till you get pea sized crumbles. No loose flour must remain.
5. Press half the dough lightly into the bottom of the baking pan.
6. Add the filling mixture. (If there is too much liquid use a slotted spoon and leave out the liquid.)
7. Crumble the remaining dough on top.
8. Bake for 45 minutes or until the top is golden brown. Cool Completely before cutting.

P.S - The excess liquid from the filling can be thickened in the microwave or stove top and used as a topping, Yum!

Happy Eating!!

Wednesday, August 22, 2012

White Chocolate, Pudding and Pistachio Cake


Eid Mubarak everyone!  I know I am three days too late but better late than never right?

Well, I will make it up to you by telling you how to make this cake. Coz this cake is what you need to make right now. This was our dessert on eid day and I was really worried about how all the components would work together. Turns out, there was no need to worry as it was fabulous.


Now, I took some shortcuts and used a box mix for the cake and filling because I was fasting and did not have the patience to make everything from scratch. But if you do go that route I am sure it'll only taste even more fantastic. I wanted to do a tuxedo effect on the top because I had seen it before on Annie's Eats and loved it. A previous attempt had turned into a disaster so I was very careful this time and almost nailed it. Because the cake was cold the ganache would firm up on top itself and not actually pour down the sides. Next time I'll bring the cake to room temperature before pouring the ganache.


There are four parts to this cake: Cake, Filling, Frosting and Topping. The cake and filling can be made one or two days ahead and stored in the fridge but the frosting and topping are better made the same day of assembly.

Recipe

Ingredients
For The Cake
1 Box (500 gms) White Cake mix with egg whites, water and oil called for on the box
For The Filling
1 Packet (4 serve) Vanilla Jello Instant Pudding and Pie filling with milk called for on the box
For The White Chocolate Whipped Cream
113 Grams / 4 ounce White Chocolate (Use a good quality, I used Lindt)
1 Cup Heavy Whipping Cream (Chilled)
For The Topping (Ganache) - From Annie's Eats
56 Grams/2 Ounce Semi Sweet Chocolate (I used Lindt)
1/4 Cup Heavy Whipping Cream
2 Tbsp Light Corn Syrup
1 Tsp Vanilla Essence

100 Grams Toasted Pistachios (Hulled and Roughly chopped)

Make The Cake
Prepare and Bake the cake as directed on the back of the box in three 7 inch pans. Cool completely and cover with plastic wrap till required.

Make the Filling
While the cake is baking, Prepare the pudding according to the instructions on the jello pudding box. Cover and refrigerate until required.

Make the Frosting
1. Place the white chocolate in a heatproof bowl and melt on a double boiler or in the microwave.
2. Place 1/4 cup of the heavy cream in a small saucepan and bring to a simmer.
3. Immediately add the cream to the melted chocolate and mix very well. Keep aside to cool completely.
4. Place the remaining 3/4 Cup cream in the bowl of your stand mixer and whip till soft peaks form.
5. Add the white chocolate cream mixture (it should be completely cooled) to the stand mixer and whip till it holds firm peaks. Be very careful not to over beat.
6. Cover the bowl (I used the bowl of my stand mixer itself, you can transfer to another bowl if you like washing dishes) with plastic wrap touching the surface of the cream. Refrigerate for two hours.

Make the Ganache
1. Break the chocolate to small pieces and place in a bowl.
2. Bring the cream to a boil and pour over the chocolate. Let it sit for a minute then stir completely.
3. Add the corn syrup and vanilla. Mix well.
4. Keep aside to thicken, meanwhile start assembling your cake. (If you take a long time to assemble a cake then make the ganache after the cake is assembled)

Assemble The Cake
1. Level the tops of all the cake layers. Dab a smear of the frosting on a cake board and place one later bottom side up on the board.
2. Add half the pudding filling on the cake and spread evenly. Do not spread till the edges.
3. Add 1/4 C of the chopped pistachio pieces.
4. Repeat with a second layer of cake, pudding and pistachios.
5. Place the last layer and do a crumb coat with the frosting. Place in the fridge till it sets.
6. Remove from fridge and frost completely.
7. Pour the ganache slowly over the middle of the cake giving it time to gently drip of the sides. If it sets spread gently with an angled spatula.
8. Garnish the top with pistachios. Place in fridge till cake is set. Store leftovers (If any) in the fridge.

Happy Eating!!

Friday, July 27, 2012

Daring Bakers July 2012 - Baked Puris or Crackers


Ramadan has started and it has already been a week of fasting. This year I am actually trying to avoid unhealthy fried food that is on the menu at every iftaar. On my quest to eat healthy we make Fruit Chat every day along with one other snack that is not fried. So far I have made Chicken Cutlets, Aloo chana chaat and dhokla, all easy and relatively healthier.


Blog Checking Lines: Our July 2012 Daring Bakers’ Host was Dana McFarland and she challenged us to make homemade crackers! Dana showed us some techniques for making crackers and encouraged to use our creativity to make each cracker our own by using ingredients we love.


When I made the chat I was supposed to buy puris from the market to use in it. But then inspiration struck and I thought why not make a cracker from the challenge and use it instead? The crackers are extremely easy to make and hardly took any time. Moreover since they are not deep fried I can easily snack on them!

Recipe Source - Tarla Dalal

Ingredients - Makes 25 Puris (crackers)

100 Gms Whole Wheat Flour
1 Tsp Vegetable Oil
A Pinch of Salt
1/2 Tsp Red Chilli Powder
1/2 Tsp Roasted Cumin Seeds
A pinch of Aamchoor Powder (Dry Mango Powder - Optional)
Water To Knead The Dough - As required

1. Mix all the ingredients in a bowl except the water and stir well.
2. Add water a little at a time until the dough comes together. Do not add too much water as the dough should be stiff. Knead well and keep aside for 10 minutes.
3. Grease a baking tray slightly and pre heat the oven to 200 Degree C/ 400 Degree F.
4. Take a little dough at a time and roll it out as thin as possible. Using a round cookie cutter, cut out circles and prick them with a fork Place on the baking tray.
5. Continue till all the dough is used up.
6. Bake for 10 minutes. Cool and store in an air tight container.

Happy Eating!!